Drag the slider to adjust text size.
If you are looking for a reliable way to stream movies on Kodi without dealing with broken links or empty folders, a dedicated Video on Demand setup is exactly what you need. The Nite Owl Build has recently gained massive popularity among users who want a clean, lightweight, and fast interface strictly focused on movies and TV shows. In this Kodi build installation guide, we will walk you through the exact steps on How to Install Nite Owl Build on Kodi safely and correctly.
🔒 Protect Your Kodi Streaming
Avoid ISP tracking and stream Kodi safely using one of the fastest and most trusted VPN services.
✔ Works with Kodi & Firestick
✔ No Logs Privacy Protection
✔ 30-Day Money Back Guarantee
Recommended for safe and private Kodi streaming
Whether you are using a FireStick, Android TV Box, Windows PC, or NVIDIA Shield, this guide is designed for beginners and intermediate users alike. We will keep the instructions simple, clear, and easy to follow so you can start watching your favorite content in minutes.
What is the Nite Owl Build?
The Nite Owl Build is a specialized Kodi VOD build designed specifically for on-demand content. Unlike heavy builds that cram live TV, sports, and music into one package, Nite Owl focuses entirely on providing a premium movie-watching experience.
Because it strips away unnecessary features, it operates incredibly fast on low-memory devices like the Amazon FireStick. It consistently ranks as one of the best Kodi builds for movies because it pulls in high-quality links from some of the most reliable free movie addons available today.
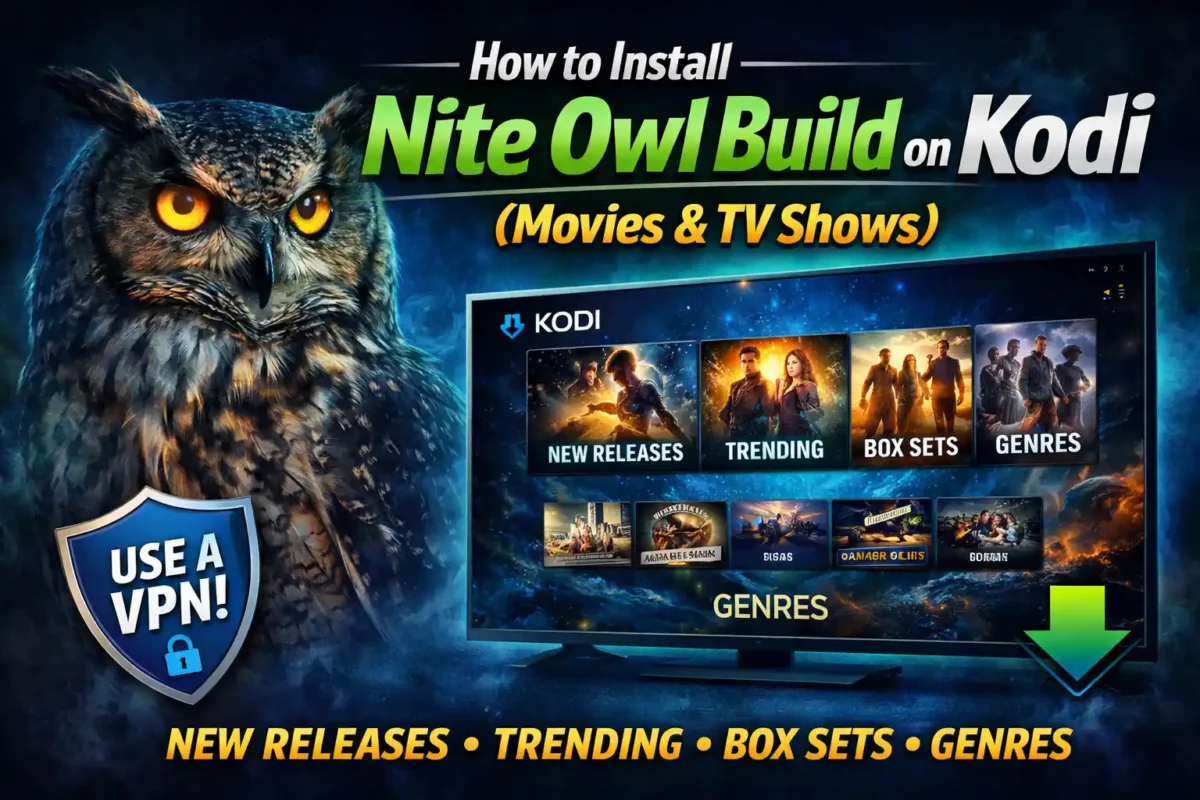
The interface is visually appealing but straightforward. You will not get lost in complex menus. Instead, you are greeted with a neat layout featuring categories like New Releases, Trending, Box Sets, and Genres. If your primary goal is to binge-watch TV shows or catch up on the latest cinematic releases, this build is a perfect match.
Important Prerequisites Before You Start
Before jumping into the installation steps, there are a few critical things you must do to ensure your privacy and prevent buffering.
- Use a VPN: Kodi addons often scrape content from various sources across the web. Your internet service provider (ISP) can see this activity, which may lead to bandwidth throttling or privacy warnings. Always use a VPN to hide your streaming activity.
- Enable Unknown Sources: Kodi does not allow the installation of third-party builds by default. You must change a setting in the system menu to proceed.
- Clear Your Cache: If you are replacing an old build, it is highly recommended to clear your Kodi cache or perform a fresh install. This prevents the new build from suffering the same glitches as your old one.
How to Install Nite Owl Build on Kodi
The installation process requires you to download the Nite Owl wizard from an external source URL. Follow these exact steps in order.
Step 1: Allow Unknown Sources
First, you need to tell Kodi that it is safe to install add-ons from outside the official repository.
- Open Kodi on your device.
- Click the Gear icon (Settings) in the top left corner of the home screen.
- Select System from the menu.
- Scroll down the left sidebar and click on Add-ons.
- Toggle the switch for Unknown sources to turn it ON.
- A warning message will appear. Click Yes to confirm. You are now free to install third-party repositories.
Step 2: Add the Nite Owl Source
Now, you need to point Kodi to the exact web address where the build file is stored.
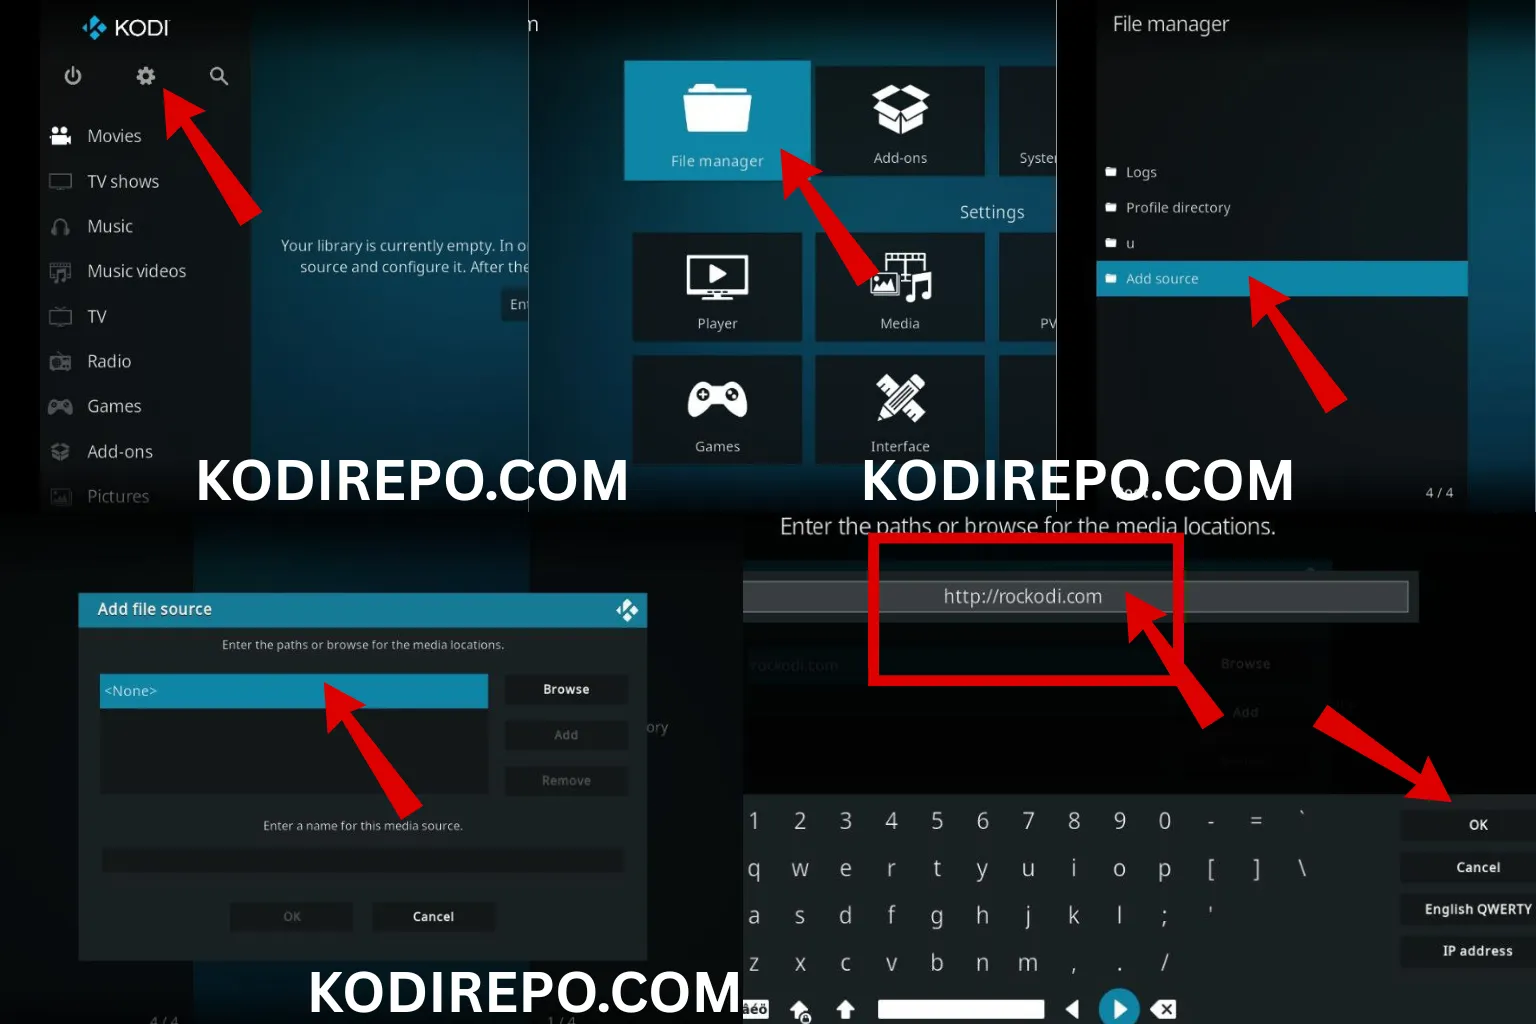
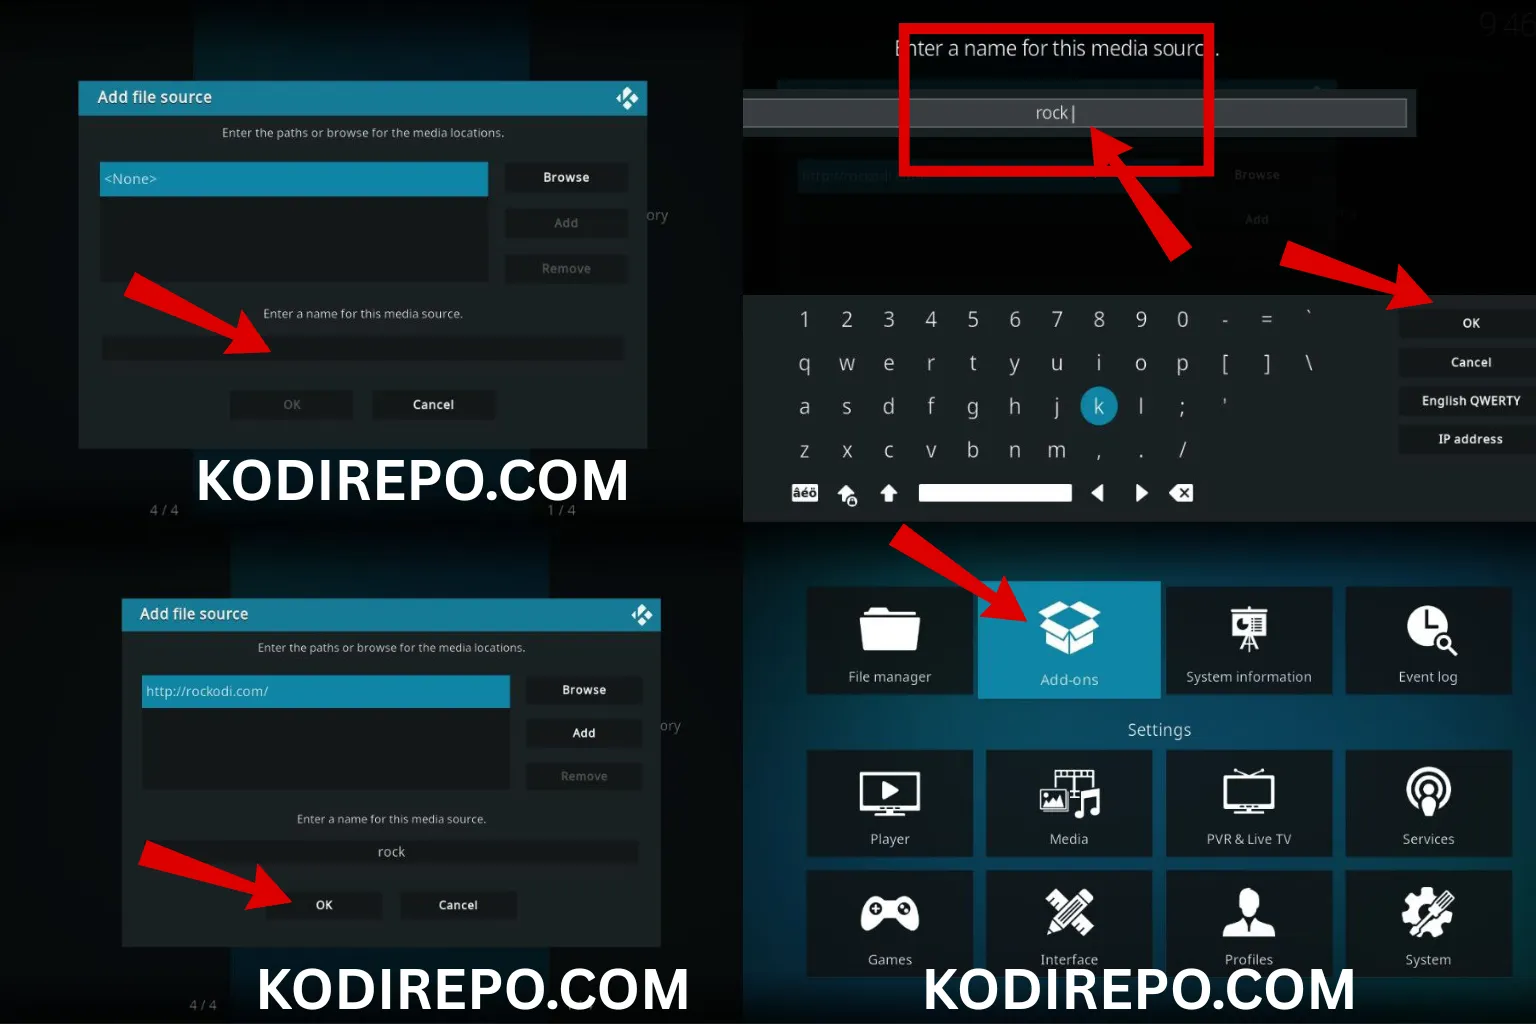
- Go back to the main Kodi Settings menu.
- Click on File Manager.
- On the left side of the screen, double-click on Add source.
- A box will pop up. Click on the option where it says “Enter the paths for the media locations.”
- Type in the exact URL for the Nite Owl source carefully. ( https://the666mafia.github.io/repo/)
- Click OK after entering the URL.
- Highlight the box below that asks for a media source name. Type Nite Owl and click OK.
- Return to the Kodi home screen.
Step 3: Install the Repository
With the source added, you can now download the necessary files to your device.
- From the Kodi home screen, click on Add-ons from the left menu.
- Open the Add-on browser (the open box icon in the top left).
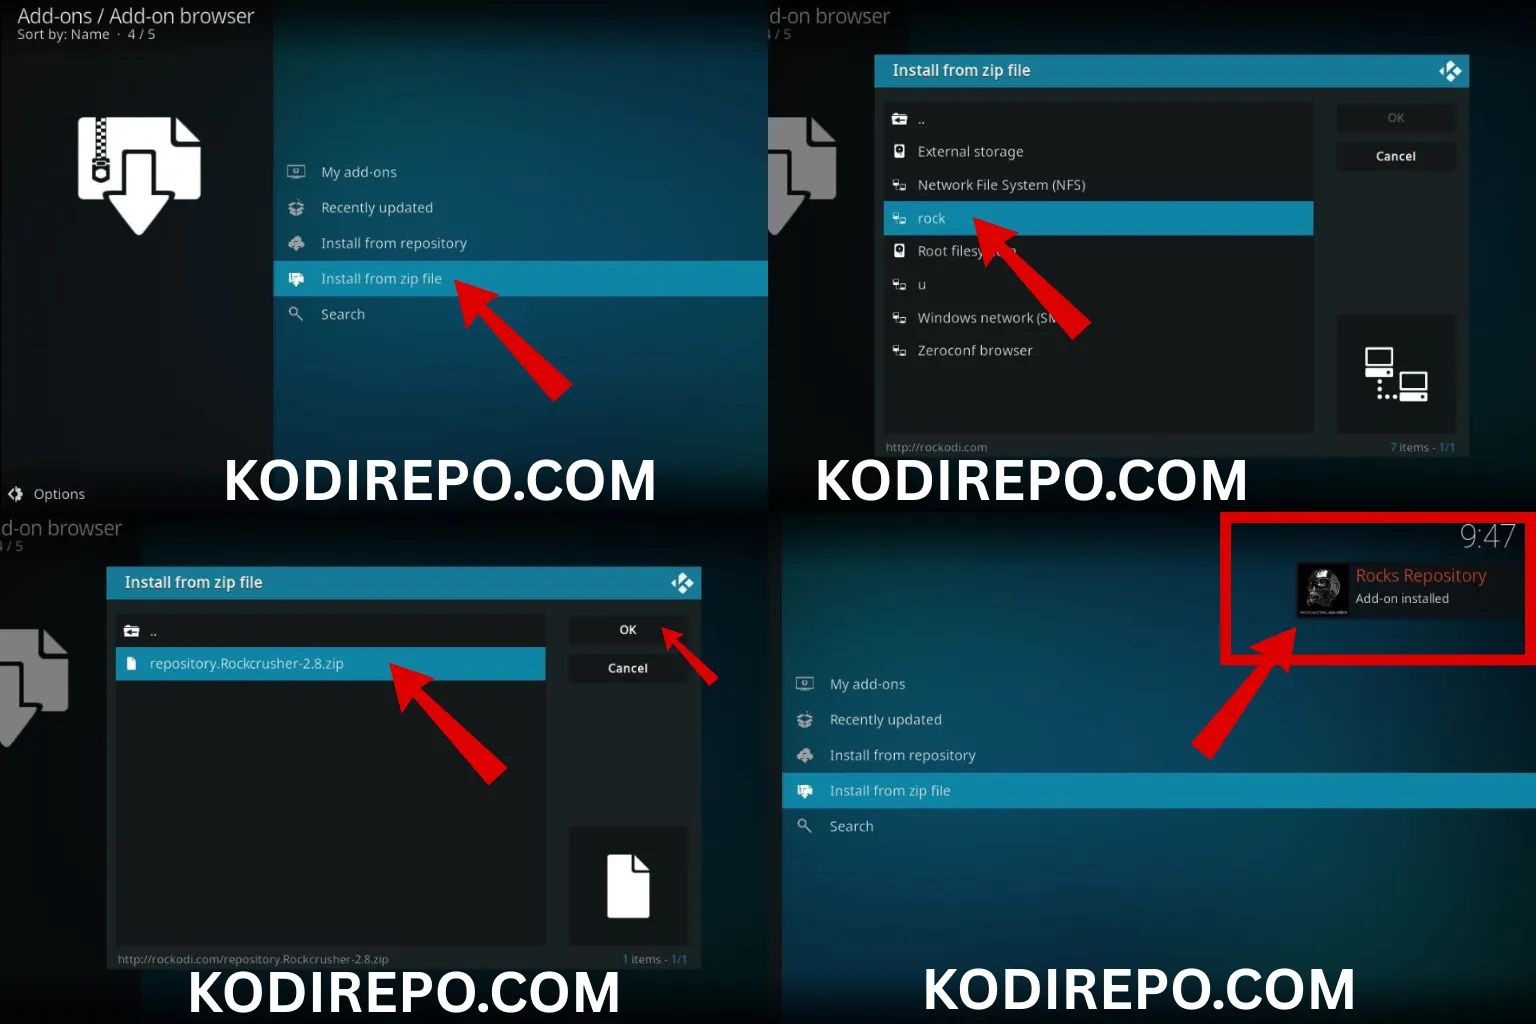
- Select Install from zip file.
- A pop-up will appear. Click Nite Owl (the name you gave the source in Step 2).
- Click on the repository zip file displayed (usually named something like
repository.niteowl-x.x.x.zip). - Wait a few seconds. You will see a notification in the top right corner confirming that the add-on is enabled.
Step 4: Install the Build
Now that the repository is active, you can access the wizard and install the actual build.
- Once again, click the Add-on browser icon.
- This time, select Install from repository.
- Find and click on the Nite Owl Repository.
- Select Program add-ons.
- Scroll down and click on the Nite Owl Wizard.
- Click the Install button at the bottom right.
- Wait for the “Add-on installed” notification to appear.
Step 5: Run the Wizard and Apply the Build
You are almost done. Now you just need to trigger the installation process.
- Return to the Kodi home screen.
- Click on Add-ons from the main menu.
- Select Program add-ons.
- Open the Nite Owl Wizard.
- You will see a list of available versions. Select the (New VOD Build) option.
- A menu will pop up giving you the choice between a “Fresh Install” or a “Standard Install.”
- Choose Fresh Install if you want to wipe all your old addons and data for a completely clean slate.
- Choose Standard Install if you want to keep your existing addons alongside the build.
- Click Continue.
- The build will now begin downloading. This usually takes 3 to 5 minutes depending on your internet speed.
- When prompted, click OK to force close Kodi so the new interface can load properly.
Exploring the Nite Owl Build Interface
When you reopen Kodi, the standard default skin will be gone, replaced by the sleek Nite Owl interface. As a modern Kodi 20 Nexus build, it runs incredibly smoothly.
The home screen is intuitively laid out. You will not see cluttered widgets taking up too much memory. Instead, you get direct access to:
* Movies: Categorized by genre, year, and popularity.
* TV Shows: Featuring full seasons and updated episode lists.
* Trakt Integration: If you have a Trakt account, you can easily sign in to sync your watchlist and pick up where you left off on other devices.
All the included free movie addons are pre-configured to work together. When you click on a movie, the build automatically scrapes multiple addons in the background to find the highest-quality 1080p and 4K links available.
Tips to Optimize Your Streaming Experience
Even the best builds can run into issues if your device or network is not optimized. Here are a few expert tips to get the most out of your setup.
Apply a Reliable Kodi Buffering Fix
Buffering is the number one complaint among Kodi users. To apply a quick Kodi buffering fix, go to Settings > System > Advanced. Scroll down to the “Playback” section and increase the “Cache size” slightly. You can also install an add-on like Ares Wizard to automatically adjust your cache settings based on your device’s RAM. Additionally, closing background apps on your FireStick or Android box will free up system memory.
Keep Your Build Updated
Developers frequently push updates to fix broken links and add new features. Once a week, open the Nite Owl Wizard from your Program Add-ons folder. If an update is available, it will prompt you to install it. Always choose a “Fresh Install” when updating to avoid conflicting files.
Use Real-Debrid for Premium Links
While the Nite Owl Build works perfectly fine with free links, integrating a Real-Debrid account will completely transform your experience. Real-Debrid is a premium link generator that unlocks high-quality, buffer-free 4K streams. You can usually link your account directly through the build’s settings menu.
Final Thoughts
Finding a build that strictly focuses on high-quality Video on Demand content without bogging down your device is rare. The Nite Owl Build accomplishes exactly that. By following this Kodi build installation guide, you have successfully transformed your standard media player into a powerful movie-watching machine.
Remember to always prioritize your privacy by keeping your VPN active while you stream movies on Kodi. With the correct setup, proper cache management, and the clean interface of the Nite Owl Build, you are guaranteed hours of seamless, high-definition entertainment. Enjoy your new setup!